
Who hasn't dreamed of being on the first page of Google search results in every language? It may be done by creating a multilingual WordPress site. Translation can be a tricky business, but with this detailed guide, you'll learn about the benefits of multilingualism, what’s what and how you can do it with your own hands and a PC or a laptop.
Why translating WordPress?
Global domination is just one of the reasons. By translating your WordPress website into other languages you can
Get more international traffic and visitors, which can increase your sales
A few numbers to back it up:
- Even among people with high English proficiency, 60.6% prefer to surf the Web in their native language
- About 90% of online shoppers choose their native language when available
- Nearly 75% of Internet users prefer to read product information in their native language
Improve the trust and loyalty of your international customers with multilingual support
A multilingual website increases customer retention and loyalty if you offer support in their native language, 74% would even be willing to renew their purchase on an e-commerce website if it supports their language.
Attract international media
A media will more easily relay a news item if it is available in its main language, which would cause an increase of your notoriety in a new country at a lower cost for you.
Improve your position in Google search results and stand out from the competition
Many niches that are saturated in English-speaking markets are not in other languages. You could quickly become a dominant player in another language. One way to attract traffic to your site is to adjust your content to the most popular keywords. If you adopt this strategy for all languages, then you multiply your chances of getting a higher ranking in search results.
Check a must-have box depending on your industry and strategy
The main industries concerned with translation are tourism, e-learning sites (because it is easier to learn in your native language) and e-commerce sites. Finally, analyze your data on Google Analytics and make your decision based on the numbers and trends.
Exporting the WordPress content
Exporting your content to another website is an issue many WordPress users deal with from time to time. If you are good at MySQL and know how databases work, there will be no problem for you to find a database management tool and use it to copy your post and pages.
If MySQL is not your thing, there’s always an option for you too. The Official WordPress Importer lets you export posts, pages, comments, tags and everything in between to another WordPress site.
Exporting content to another website
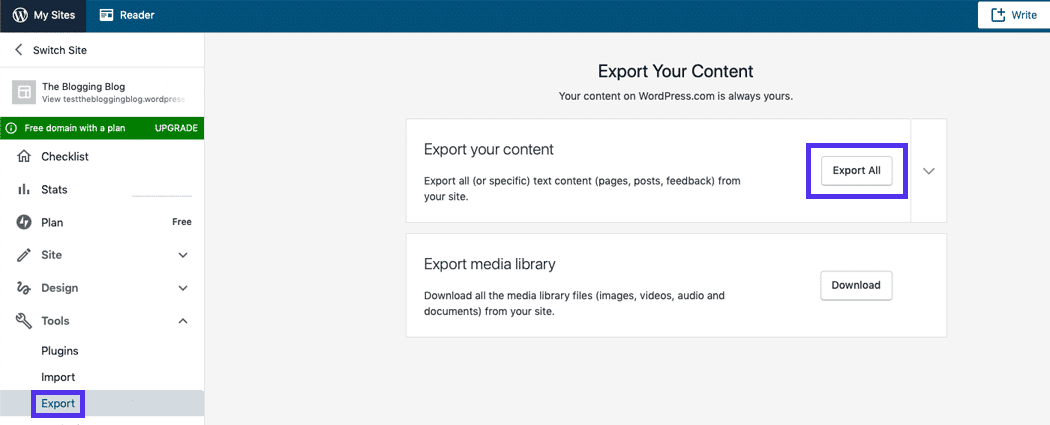
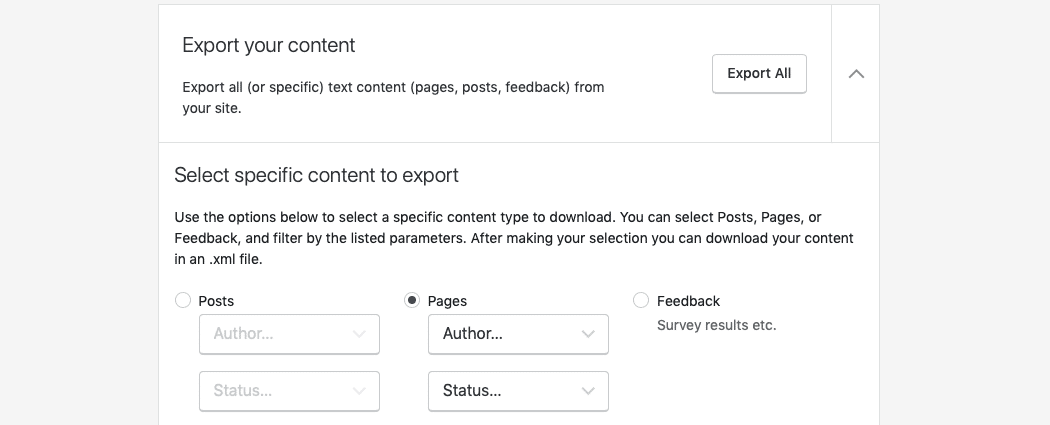
The basic version of WordPress (i.e. without extensions installed) includes the export feature. You can find it in the main WordPress menu in the Tools section. It has 3 options. The first option retrieves all content including posts, pages, comments, custom fields, custom posts, categories, terms, navigation menus and media. Another option allows you to choose to export only articles or pages. You can filter what should be exported and, for example, extract only the content affiliated to certain categories or authors. But also select a range between two dates or according to the publication status. Once you have decided what content to export, save the XML export file to your computer using the blue Download Export File button.
Importing content from another website
Now go to the website that will host the content, the same Tools section in the main menu. The import functionality is not built into WordPress, because it wants to stay as light as possible in its original version. Through extensions (plugins), it becomes compatible with eight official import systems including Blogger and Tumblr. Several other unofficial import plugins are also available. Since we are importing from another WordPress website, we need to install the WordPress installer. You can do this manually by downloading the WordPress Importer extension from the Extensions > Add tab.
A more convenient solution is to click on the Install link in the WordPress section. After a few seconds, the link changes to Run Importer. When you click on it, you are redirected to the import page. This is where you can upload the previously downloaded XML file. After attaching your XML file and clicking on the blue Send File and Import button, you will assign authors to your imported content. A very useful option when you have the same authors on both WordPress sites. Finally, it is also possible to create a new account for the publications of each author.
This page also offers an option to upload attachments. When selected, WordPress will attempt to import any images that are attached to the posts and pages you import. By clicking on Submit, your content will be imported to your site. Now check your pages and articles. And that's it! All the information will remain strictly identical after the import: the articles and pages will have the same publication dates and will be linked to the same categories.
Some more things to know
Though the WordPress importer is very useful to migrate content from one site to another, it is not the solution to choose if you plan to transfer your entire website - because the settings will not be transferred. In this case, use other methods dedicated to the transfer and migration of WordPress sites. You should also know the download limit of the WordPress file is applied to the WordPress importer. This default download value is set by your hosting company. Often, this limit is 8 MB, but sometimes it is even 2 MB. This can cause difficulties when you import many posts and pages.
The best solution is to ask your host to increase the file upload limit for you. If they refuse to do so, consider changing it. If an error occurs during the import process, don't panic. Restore the site with the backup you made earlier. You can then restart the process.
What should you translate?
It’d never be wrong to translate everything. And it makes sense if you think about it - users want to understand every last word on your page. And so want search engines. So if you don’t want to confuse your visitors and improve your search results ranking, translate everything. And by everything we mean, yes, everything from blog posts, tags and menu items to meta titles and page descriptions to images and URLs. Images have descriptions that need translation and URLs must be in the language your website speaks or else they won’t find it.
Everything should be consistent and in a single language because you don’t want your website to seem unfinished. Visitors want to understand every single bit of the information you give them, and search engines need to know what they deal with to rank you properly.
Which WordPress translation plugins to choose (and how to install it)?
If we want to translate a WordPress website into other languages, we need to ask ourselves some questions that will help us choose which WordPress translation plugin to use. We can decide on free or paid translation options, depending on the features of the website, our needs and the available budget. Here are the most searched plugins by users on Google for WordPress website translation:
Paid plugins to translate a WordPress site
WPML: it is the translation plugin par excellence for WordPress. It allows the translation of content manually, with a team of translators or through professional translation services. It allows the translation of pages, posts, custom types, taxonomies, menus and even WordPress theme texts. A real translation solution priced from $29. If you want to know how to download and install WPML plugin, please visit the WPML official website for guidance
Ajax Translator Revolution: this is a premium plugin used by the Google automatic translator. It translates into more than 60 languages. The plugin installs a bar in the upper part of the page, with the languages you want to include. It is an automatic translation, so it will not be perfect. Therefore, it is advisable to make manual corrections and changes. The regular license is $25. If you want to know how to download and install WPML plugin, please visit the Ajax Translator Revolution official website for guidance
Free translation plugins
Polylang: translations are done manually through the site's own editor. This is one of the best-rated free plugins by users. It translates content, categories and menus. Each page is translated independently, facilitating the use of WordPress plugins to improve web positioning, and also allows us to manage URL translations, both by folder (www.mysite.com/eng) and by directory (eng.mysite.com). More info here
GTranslate: this plugin uses Google's translation technology. Once installed and set up on the widget page of our WordPress, we need to add it to the sidebar. After that, we can automatically translate any page of our website. The plugin offers the paid option to revise translations, translate URLs, etc. The major drawback is the quality of Google translations is not very reliable. Check it out here
Considering translation of your WordPress website and translation plugins, please remember that to translate your website professionally, you need to hire a translation agency, because a poor translation could seriously undermine the idea. With PoliLingua, you can translate your WordPress website by taking advantage of our professional translation services. The result? A well-translated website in one or more languages, with no effort on your part.
What URL structure should you use?
The almighty Google recommends using a URL structure that helps it to geotarget users on the language basis. Use top-level domain (mysite.com for English, mysite.fr for French, mysite.es for Spanish, etc) or a subdomain (fr.mysite.com, es.mysite.com) or a subdirectory (mysite.com/fr, mysite.com/es) for each language. Try not to overdo - your URLs are made for users, not machines and Google must read it smoothly to get the idea what country it’s from.
What are hreflang tags?
Hreflang tags are simply used to tell Google the country and language of each page on your website. For the search engine, this is a very important indicator. Indeed, although it is not the only criterion considered defining the language and the country of a website, it is still very important. If you want your website to be well-positioned internationally, your site must be considered as local by Google. So, if you have a website in English that is aimed at the British market, there is no point in being well positioned in the French search engine. This is not the way to attract qualified visitors to your website.
That's why we strongly advise you to integrate Hreflang tags into your website. It may take a little time, but it is an investment you will not regret. Google will have no choice but to understand that your website is in English and is aimed at a targeted geographical area, the UK. You want to succeed with the international referencing of your website. You understand that you will have to implement Hreflang tags on the different pages of your website. However, you don't know where to start.
In reality, integrating Hreflang tags on a website is not complicated. As long as you take the time to fill them in according to the defined standards. You have a website for 4 target countries: the USA, Germany, Spain and Portugal. So we have 4 directories (if you remember the explanation in the previous article): One directory for each target country
- http://www.mysite.com/en/mypage-en for Global/USA
- http://www.mysite.com/de/mypage-de for Germany
- http://www.mysite.com/es/mypage-es for Spain
- http://www.mysite.com/pt/mypage-be for Portugal
These tags are placed in theof your pages.